


We get very little wind here in San Diego, and when we do, it’s generally right down the runway (from the West; or in the case of the atypical ‘Santa Ana’, from the East). It’s easy to get lackadaisical with your crosswind landing and takeoff technique, when there is seldom enough of a crosswind component to challenge and build those skills.
Directional control on landing --- keeping the longitudinal axis of the plane aligned with the runway centerline --- is important in all airplanes, and critical in tailwheel planes. Because the center of gravity is behind the main wheels in a taildragger, the tail is always trying to come around, as the plane acts like a giant weathervane when there’s wind.
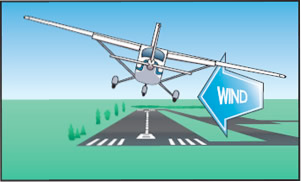
When you apply left aileron, an airplane will generally begin to bank to the left (whether coordinated or uncoordinated --- slipping or skidding --- depending on what your feet are doing on the rudder pedals). To correct for a crosswind from left of runway centerline, we want to drop the left wing, using left aileron. But, to keep the plane from actually turning to the left, we use the right rudder pedal to yaw the nose back to the right to maintain centerline.

While you fight to keep the airplane on centerline, you will reach a limit at which the rudder pedal is firmly pressed against the airplane’s floorboard, yet the plane continues to drift past centerline. You still have aileron authority remaining, but you have run out of rudder authority. You have now officially exceeded the crosswind component for that airplane --- at least on that runway, with that wind (switch to a more favorable runway --- or airport --- to maintain directional control on landing!)
A good way of practicing the control inputs you’ll need on crosswind landings (and take-offs too, although an accelerating tailwheel plane is somewhat less troublesome than a decelerating tailwheel plane on landing) is to practice a flight maneuver incorrectly referred to in General Aviation circles as “Dutch Rolls”. (Related to weak positive directional stability, Dutch roll really pertains to roll stability designed into an airplane).
Extra Credit
•Practice the sideslip maneuver in a crosswind inches over a runway, without actually letting the wheels touch.
•If you request full use of 26-Right at Brown (8,000+ feet), you’ll literally have a mile and a half to begin to ‘dial-in’ what this sideslip will look like on final as you fight to keep the longitudinal axis of the airplane aligned with runway centerline!
Begin to go back and forth from left to right, moving the stick faster and faster as you get more adept at holding the landmark on the same spot out the windshield with opposite rudder. When you get it out there --- all the way left or right --- try to hold it for a couple seconds. This is what you’ll be doing all the way down final, perhaps even touching down on the upwind wheel first, when landing in a crosswind.
Dutch rolls is a great coordination maneuver to help you learn the control inputs you’ll need to hold your airplane on centerline, but it does get a little trickier when you’re much slower (at final approach speed), and just a few inches off the runway. Practice with your instructor at altitude, and then begin to dial it in as you get closer to the runway. Watch the in-flight video (click here) for more tips and instruction.
© 2011 Garry Wing


