12/15/13


If you just got a new iPad or ForeFlight subscription for Christmas, or even if you’ve been using the app for a while, here are some of my observations and suggestions. Between instructing and cross country trips, I’ve probably flown with ForeFlight about 300 hours over the past year or so. Everyone has their own personal preferences, so I’m not going to get into the Track Up or North Up debate --- try both and choose the one that best suits your situational awareness (for me, Track Up/Forward makes more sense as it replicates the way I always flew with a paper sectional chart).
Here are some basic settings and suggestions that might help you get the most out of your use of ForeFlight. If you have any favorites to add, or I think of more later, I’ll update this list. At the end of the list I’ve posted some screenshots of all my settings so you have something to start with.
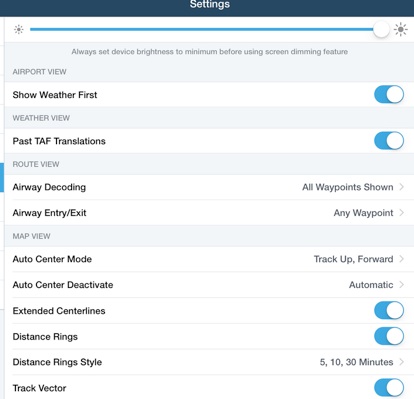
Distance rings. I have them set to 5, 10, 30-minutes. This is very helpful in determining when to call ATC or make a turn, but the added bonus is the little green arrow at the most forward part of each ring. Think of them as mini Track Vectors (see next item). Remember the GPS-derived data is updating in real-time and ‘self-corrects’ for wind. This makes it really easy to see if your current course is going to take you to your next waypoint, or left or right of it.
Track Vector. I have this set for 2-minutes. In the single-engine  Blue track vector shows where the airplane will be in 2-minutes. planes I fly (all < 200 knots), two minutes seems like enough warning for terrain and airspace avoidance and to show me how close I am to the GPS DTK to my next waypoint.
On the Map, I leave Hazard Advisor and TFRs on in flight (60% opacity). Even though TFRs won’t update in real-time while flying, any TFRs that existed when I last had the iPad on Wi-Fi (just prior to the flight) will be displayed. ForeFlight now does a fine job of displaying pending (yellow) and active (red) Stadium TFR’s, providing times, dimensions of the restricted airspace and even the teams playing! (Feature added in 2014)
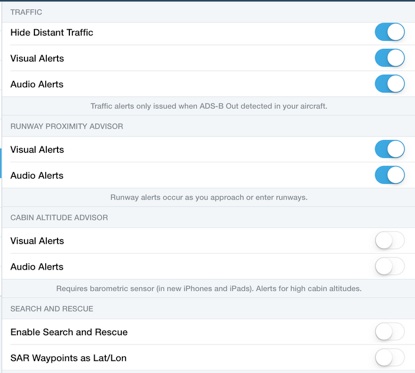
Runway Proximity Advisor - on (both Visual and Audio Alerts). 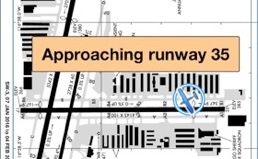 You can’t really understand the audio alerts distinctly with your headset on, but you do hear something coming from the iPad, and that’s a good enough alert to then look down at the iPad and see you are approaching a runway.
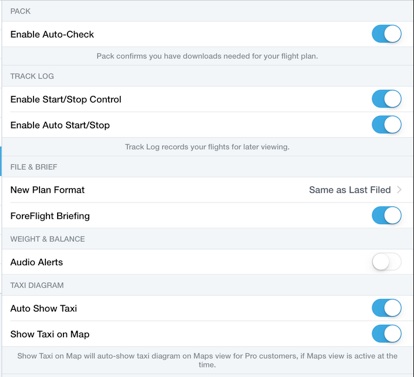
Auto Show Taxi - on. Upon landing, the map will automatically switch to the airport taxi diagram. Keep in mind all of these moving map features only work with the ForeFlight Pro subscription.
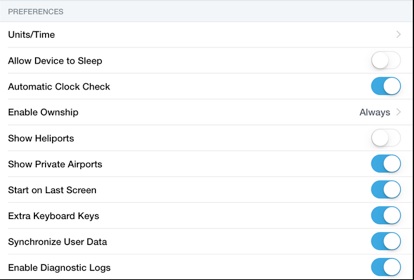
Allow Device to Sleep - off. Yes, it would save the battery to allow your iPad to sleep, but I have found it always goes to sleep at the worst time. Better that you put the device into standby when you don’t need, but when it’s on, it STAYS on!
One of the most useful functions in the Map app is the two finger time/distance/fuel ruler. This is the easiest way to visualize a direct route between two points. As desired track in both directions is displayed, it makes no difference the chart orientation or how you place two fingers on the map.
Determining Magnetic Course. Remember, in this GPS world, wind correction is automatically applied. ForeFlight will use the  Type in ‘80,000’ to ‘fool’ ForeFlight so you can see ‘no-wind’ course and airspeeds. most-recent winds aloft data on your device during flight planning (and of course real-time track data in the air). But sometimes you may not want this. There is no way to “turn winds off” in ForeFlight, but here’s a great workaround I found to simulate a “no-wind” condition: Set cruise altitude to 80,000’. There of course is no wind data at that altitude, and ForeFlight will show you magnetic course, with no WCA applied.
Become familiar with Annotations, which were added a couple 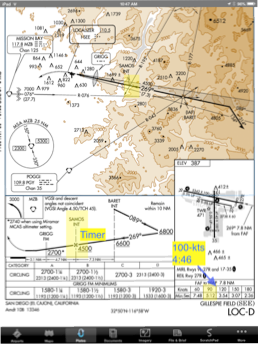 Annotation reminders on plate version updates ago. Annotations enable you to write (or type) directly onto a chart, plate or document. And when the item is updated (a new version downloaded), the annotations are still linked! I’ve used this to add TPA to airport diagrams and to highlight critical steps in an IAP (for example, remembering to start the timer at SAMOS). There’s a good tutorial in the ForeFlight Pilot’s Guide to show you how to use annotations.
Sending Plates & Taxi Diagrams to the Map. This is a great new feature, especially when flying an unfamiliar instrument 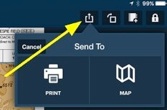 Touch here to overlay plate on top of map. approach. Open the plate, then click the “Send To” icon (the small box with an arrow jumping out of it in the upper right corner) and select “Send to Map”. It will overlay the plate on whatever chart you are using (VFR or IFR). This enhances situational awareness greatly. Adjust the opacity setting so you can “see two things at once”. Once I’m established on the approach, I then tap the overlayed plate and select “View Fullscreen” to get rid of the chart. I’ve also used this feature at unfamiliar airports to overlay the taxi diagram onto the chart and give me a better picture of where the runways are, and then where we’re going to most likely taxi to get to our destination on the field.
I use the Lockheed-Martin setting to file flight plans through ForeFlight (rather than DUAT or DUATS). Shortly after filing an IFR flight plan, I will receive an email (and a Notification in ForeFlight, if you have Notifications turned on), informing me of what my expected flight plan will be. If this differs from what I  filed (it often does), here’s a tip: cut & paste the expected clearance routing into your flight plan in ForeFlight and touch the Amend button. This will update your filed plan, and you will generally receive routing from Clearance Delivery similar to this: “... cleared to WEAZY intersection, then as filed...”. Note you have to file and amend all clearances at least 30-minutes before departure time.
Click the iPad’s “Home” button three times to toggle between Day and Night mode. That’s pretty cool, but at night I’ve found just lowering the brightness on Day mode works best for me. That way I see the original charts I’m used to, only not as bright.

PRE-FLIGHT STEPS
Connect to WiFi just prior to your flight (if you don’t have cellular service on iPad). Confirm that your plates, charts and databases are up to date, and go to Maps to refresh/update TFRs. Click on Airports to update METARs.
If you don’t have iPad cell service, or forget to do previous step, use the ForeFlight app on your iPhone to accomplish the same thing (sometimes you’ll be able to do this in flight, over populated areas at a low enough altitude, so you can hit a cell tower --- with a signal; not with your airplane).
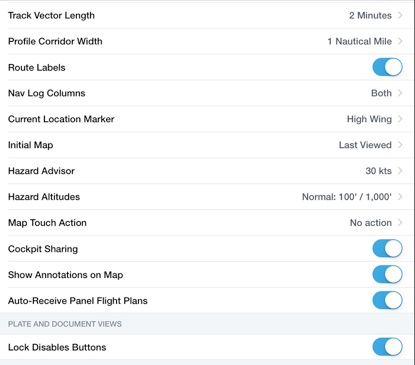
Lock disables buttons. Make sure this is enabled in your ForeFlight settings. Then, when you’re on an instrument approach, or using the airport diagram to taxi, slide the iPad lock switch to disable all the buttons at the bottom of the screen. This will keep you from accidentally closing the plate by inadvertently touching another part of the screen. You can still pinch/zoom and move around the plate or diagram itself.
Route labels ON. This allows you to see labels on route waypoints on the map in a manner so they don’t overlap with each other.
Be sure the airplane you’re flying has been added to ForeFlight. While the GPS updates time and fuel requirements in real-time while in-flight, during flight planning (when you’re still on the ground), those calculations are based on the airplane you’ve selected in either NavLog or in More / Aircraft.
Adjust Brightness in your iPad Settings (Wallpapers & Brightness), not in the ForeFlight App. Think of the iPad Setting as the Primary control; the Brightness control in ForeFlight as Trim.
MOUNTING & USABILITY
Mount your iPad so that it is viewable, usable and not in the way. If you have an iPad mini, there are many options. The older/original sized iPad does not present as many mounting options in the cockpit of an already crowded GA airplane. When instructing,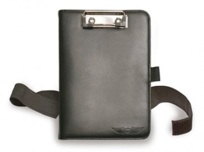 I use a kneeboard case with a small legal pad clipped to the cover (click here) (I’ve found the scratchpad in Foreflight to be next to useless).
When flying cross country in the Skylane, I used to snap the iPad into a RAM mount attached to the co-pilot’s yoke (angled toward my line of sight). I experimented with mounting it on the flanged base of the yoke (so the iPad stays stationary) and on the yoke itself (the iPad moves as you move the yoke). The only problem with either is during the preflight control checks; you’re either going to bang the yoke on the stationary iPad or smack the moving iPad against your knee or the throttle, etc. During flight it’s not a factor as the controls are neutral 98% of the time. When they’re not neutral (doing a Steep Turn or Chandelle), looking at the iPad isn’t probably your biggest priority. (Click here for yoke-mount).
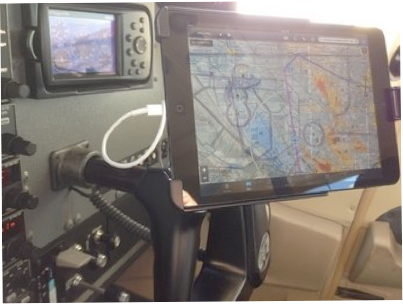
When I updated the Avionics to ADS-B (replaced KLN-94 and 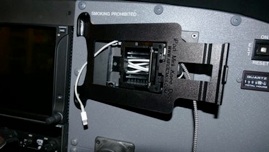 KX-155 NavCom with a Garmin GTN-750), I removed the panel-mounted 496 I used to display traffic and XM weather, and installed a panel mount for the iPad mini in its place. Thinking ahead, we also installed a 2-port 2.1-amp USB outlet behind the mount. This provides in-flight power to the iPad, and another cable for charging a SmartPhone or another device (GoPro camera, etc.).
Consider a power source on long cross country flights. The internal GPS (or use of an external GPS) really keeps the processor humming in the iPad and will eat up your battery in just a couple hours. If you have a 12v power source in the airplane, buy a car charger and keep it in the plane. You can run the iPad on power (recharging the battery while you’re using it), and if you buy a 2-amp (not 1-amp) USB charger, it will actually charge the battery more than the app depletes it, eventually resulting in a fully-charged iPad.
You can maximize battery life by turning Airplane Mode on your device ON, then going into Bluetooth and turning it back ON.
iPad - background updating off if on cell network (download updates when on WiFi). I forgot to do this one month on my iPhone, and came very close to hitting 2GB of data download that month!
You can toggle between opened Apps by using the four-finger swipe to the left or right. If you have many Apps opened, this may night be as quick as tapping the Home button twice then swiping to select the desired App, but if only ForeFlight and another App are opened, it’s a great way to go back and forth between the two.
After a major ForeFlight update, be sure to review the “Change History”. This can be found at the back of the “Pilot’s Guide to ForeFlight Mobile”, in your Documents. This will always give you a quick overview of new features or enhancements you may have missed in this or previous software updates. Also, be very wary of updating the iOS, ForeFlight app or data updates the night before or the morning of a big trip! This has burned more than one pilot (including me), when things didn’t all work as they were supposed to. Do the beta-testing and data updates prior to a local/VFR flight when if something goes wrong it doesn’t create a huge distraction.
Keep up with the latest iPad consumer products and tips at Sporty’s www.iPadPilotNews.com
If you have any favorite tips or tricks with the iPad in general, or ForeFlight specifically, shoot me an email and I’ll be glad to add them to the list!
Here are screenshots of the way I have my ForeFlight settings. Many of these are different than the default settings. You can start here and then adjust accordingly to suit your needs. (Images updated January 2016)
© 2013-2016 Garry Wing


